
Parasitic Draw Testing
By Albin Moore
This month, we feature our first guest article, written by Mr. Albin Moore. Mr. Moore is owner of Big Wrench Repair, an ASE CMAT L1 technician, a frequent contributor to industry publications and forums and has 40 years of experience analyzing and fixing mechanical and electrical problems. We have highlighted his posts/articles in the past. Here, he provides an in depth look at the process he uses to diagnose parasitic drains.
From time to time, I see vehicles with a complaint of the battery going dead if the vehicle isn’t driven every day or so. Many times, the vehicle will have a new battery or generator installed, or even a battery and a generator, yet the “it still does the same thing” complaint persists. When this happens, the thought always crosses my mind, “I wonder how much testing was done to find the real problem before the vehicle was backed up to the parts store?” Parasitic draw problem analysis can be a daunting task, especially if poor testing procedures are used.
Any time a parasitic draw problem comes to your bay, start with the basics. Is the battery up to the task of producing the power needed to keep the electronic system alive in the car as it is designed? The process should start with verifying that the proper size battery is installed in the vehicle, followed by a proper battery test to verify the condition of the battery. There is nothing more frustrating than spending your valuable time trying to find the source of a problem and have a battery that has excessive self-discharge and goes to sleep on its own when left unused for a few days.
Before testing the battery, make sure it is clean and without signs of corrosion. Speaking of a clean power source, take a look at the top of the battery in the photo below.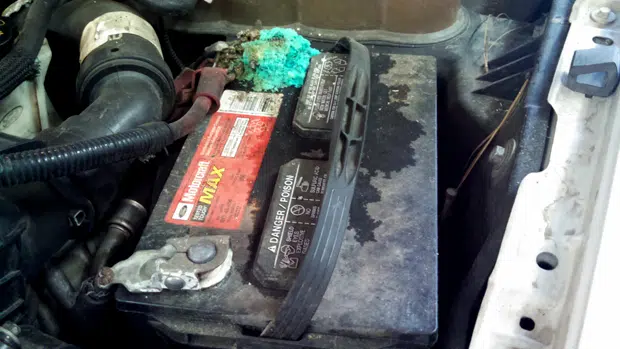 If a battery looks like a Chia pet or some kind of chemistry experiment, make sure to thoroughly clean it before testing. Use a baking soda and distilled water solution to clean any battery corrosion. If there is a grease and crud build-up on the top of the battery, clean it off first. It is amazing how much of the energy stored in the battery can get used up from the amperage flowing across the top of the battery.
Once proper battery health is verified through testing, it is time to move on to the next step and verify the maximum acceptable parasitic draw specific to the vehicle. Over the years, I have heard a lot of different numbers tossed around, which might be correct or incorrect. Many vehicle manufacturers publish this figure in their service information. If the needed information is not published, there are some easy ways to find out how much current flow a battery will sustain over a period of time and still be able to start the car. A simple formula that will work for all vehicles is to “Divide the reserve capacity of the battery by 4, or the amp hour rating by 2.4. The parasitic current drain that will be measured should not exceed this number.” Example: If a battery has a reserve capacity of 100 minutes, the current drain should not exceed 25 milliamps (.025A).
Now that you know the maximum acceptable draw in milliamps not to be exceeded, it is time to test and find exactly how much current is flowing from the battery. To do this, you will need a high current switch (photo 3) to install in the negative battery cable. These switches are readily available at most auto parts stores for a reasonable price. The high current switch is used so the vehicle can be started and driven to get all the modules active, then an amp meter can be hooked up across the battery switch, the switch opened and the current flowing from the battery will flow through the meter. This will allow the electronic modules on the vehicle to go to sleep on their own and in their own time. Some modules go to sleep rather quickly, while others can take several hours, so making a mistake while testing can cost you a lot of time. The reason I recommend using a digital or graphing amp meter is because accuracy is very important. It has been my experience that, when using a clamp-on current probe and measuring such a small amount of current, the accuracy can drift a little, which even a 5 milliamp drift can be the difference between finding the problem the first time, or getting led down a dark damp alley.
Once you have your equipment hooked up and know exactly how much current is flowing from the battery, it is time to identify where the current is flowing. On every vehicle, there are some modules that draw current all the time. Modules such as keyless entry or body control modules must be active to let you unlock the vehicle doors with your keyless entry fob. These modules are always drawing some current. Depending on the vehicle make and model, several different paths can be taken at this point. Many times, I like to hook up a break out box to the data link connector and scope the computer data lines to see if any of the modules are awake.
A very good method of finding circuits with current flowing is to use a digital voltmeter and test the voltage drop across each fuse in the vehicle until the problem circuit is found.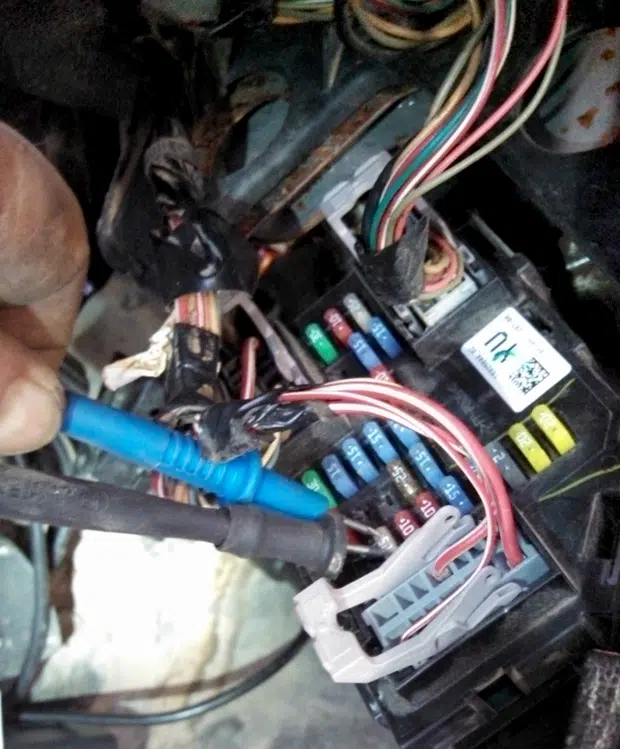 Any electrical circuit with current flowing has some voltage drop in the circuit, so this is something that can be used for diagnostic purposes. In the case of using a voltage drop test across a fuse, the DVOM should be set at the lowest millivolt scale and each fuse should be tested for voltage drop.
A great way to keep organized during this investigative process is to access your service information and print out a picture of each fuse box in the vehicle. This provides a map to follow and enables you to make notes about what is happening at each fuse. Once you know which circuit is flowing current, it is time to remove some fuses to see how this affects the current draw through the amp meter that is recording the current flow. Using a logical diagnostic process like this can and will save you a lot of time, unless you get real lucky and pull the correct fuse the first time. Keep in mind that if you pull out a fuse for an electronic module and were wrong, the module will come awake when the fuse is inserted back in its cavity, requiring you to wait until the module powers down before continuing your testing.
We recently had a vehicle in our shop that required this methodology to find the root cause of its electrical problems. It was a 2002 GMC Envoy with a complaint of an occasional dead battery.  The vehicle could be driven for a week without issue. Then, after sitting overnight, the battery would be dead. This problem was caused by an intermittent parasitic draw. The first thing we did was to hook the high current battery switch in the negative cable and then hook the amp meter up so the current draw could be monitored. By doing a little research on this vehicle, I found the AC control module could stay awake up to 6.5 hours. Service information also said the battery was rated at 100 minutes of reserve capacity, or a maximum parasitic draw of 25 milliamps or .025 amps. With the high current switch installed, the vehicle was driven for 10 miles, and all the electrical accessories were operated, including all windows and everything that is controlled by an electronic module. The vehicle was then left to sit overnight. In the morning, there was a current draw of .24 amps.
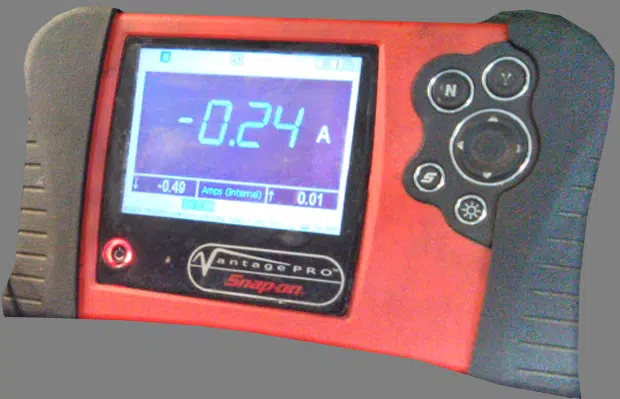
When working on late model vehicles, many times the parasitic draw can be caused by a module that fails to go to sleep. A quick way to determine if this is the case is to use a labscope to see if there is any activity on the data bus. In the case of this GM vehicle, it communicates on pin 2 of the data link connector. A scope was hooked up and I found the network was alive – this is a known good GM class 2 waveform taken after the vehicle had been sitting for 10 hours and all modules should have been sleeping. This information does a good job of narrowing the problem down to one module.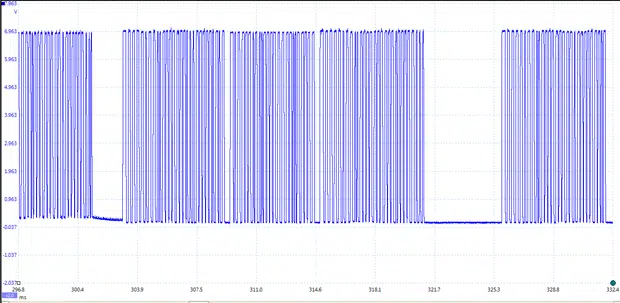
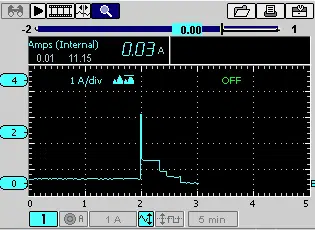
By using a DVOM to test the voltage drop across the fuses in the suspect circuit, I found fuse 12 in the rear fuse box had a .3 millivolt volt drop across the fuse. Fuse 12 powers the passenger door module. The fuse was pulled, and the parasitic draw on the battery stepped down to .03 amps from the or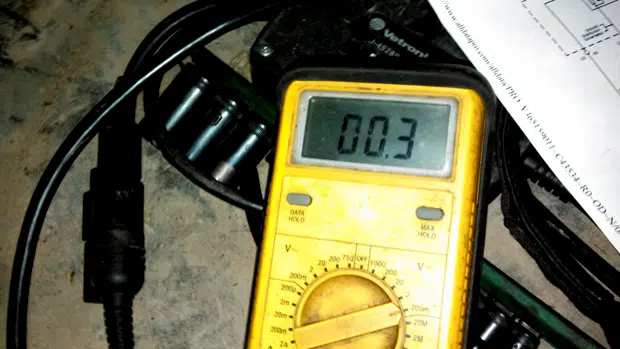 iginal .25 amps. Notice the setting on the recording amp meter. The meter is set on an amperage scale of one amp per division (5 amps on the screen). If the meter were set on a milliamp setting, it would display 25 milliamps. Since the meter is scaled wrong, it is rounding the voltage up instead of reporting the actual amperage draw. A new passenger door module was installed and programmed. After sitting for a few hours, the parasitic draw came down to 20 milliamps (.020) amps.
This method can be quite time consuming and often frustrating, but consistently using a methodical approach to diagnosing and addressing parasitic drains can reduce the likelihood of throwing unnecessary parts at a problem vehicle and eliminate the duplication of effort that comes with a haphazard approach to electrical issues. And, as you become more familiar with executing this approach, the time required to root out the source of electrical problems will decrease.


3 Responses
I’m wondering if burned out brake bulbs and low beam headlights can be attributed to this problem. I burn them frequently and dealer cannot find the problem. My lighter fuse burned out, or never worked, and after being replaced the bulbs started going out. Could there be a connection?
Lyn – Thanks for your question. Sorry for my delay in responding. I found your question in our spam folder. Yes, for sure, these things could very much be related. We would suggest getting another check of your vehicle. Clearly, you have an electrical gremlin or two messing up your system. A bad ground and/or excessive parasitic drains due to bad connections or frayed wires can cause all sorts of issues. It takes some time to find the root cause in such cases, but is the only way to fix the issue for good. Thanks, Jim from Clore Automotive
I am curious about your statement that if current is flowing there should be a voltage drop across the fuse. A fuse has no resistance, therefore the pathway through it should be no different than a good piece of wire. Therefore, the voltage into the fuse should equal the voltage out of the fuse (ie. no voltage drop). Just like a switch – no voltage drop across a closed switch.
Thanks, Rick.